Search This Blog

Wednesday, October 5, 2011

Configuring Linux DHCP to work with Lync 2010 Phones


Hello there,

i had a project with big tele-communication company to deploy Lync 2010 server , i had only one problem with this project, they are using Linux based DHCP to distribute IPs to PCs and Phones devices.

My biggest changlenge was configuring the Linux DHCP to give out numbers to the Phones , i'm a Microsoft, so i had a big problem doing that.

There is a documentation released by Microsoft Lync Team saying how to do it , but it's not that clear ,so i decided to write about it in my Blog to make it easire for others to use it.

Basically what you need to do is using the script provided by Microsoft and the output you get from the DHCPutil command-line to configure the DHCP.

Here we start:

1- Run the DhcpUtil in the Lync Front End Server:

to do that , Open your Command line Prompts ( As administrator )

browes to the location of the DhcpUtil.exe file ( it should be under C:\Program files\common files\Microsoft Lync server 2010....)

and Run the following Command line

> dhcputil.exe -sipserver "Poolname" ( poolname = FQDN of your Front end Server )


You should get the follwoing Output:


i highlighted the Two Options you will need to copy and paste them into the script and apply it to the DHCP (Option 43 and 120).


2- Editing the Script.

For the Script Copy and Past the following into a notepad

# dhcpd.conf

#

# Sample configuration file for ISC dhcpd

#


option domain-name "contoso.com";

option domain-name-servers 192.168.1.2, 192.168.1.3;


default-lease-time 600;

max-lease-time 7200;


# This is a very basic subnet declaration.


option netbios-name-servers 192.168.1.2, 192.168.1.3;

option netbios-node-type 8;


class "vendor-classes" {

match option vendor-class-identifier;

}


# vendor sepecific sub-options

option space MSUCClient;

option MSUCClient.UCIdentifier code 1 = string;

option MSUCClient.URLScheme code 2 = string;

option MSUCClient.WebServerFqdn code 3 = string;

option MSUCClient.WebServerPort code 4 = string;

option MSUCClient.CertProvRelPath code 5 = string;


# SIP Server Option 120

option UCSipServer code 120 = string;


subclass "vendor-classes" "MS-UC-Client" {

vendor-option-space MSUCClient;

option MSUCClient.UCIdentifier 4D:53:2D:55:43:2D:43:6C:69:65:6E:74;

option MSUCClient.URLScheme 68:74:74:70:73;

option MSUCClient.WebServerFqdn 70:6F:6F:6C:2E:63:6F:6E:74:6F:73:6F:2E:63:6F:6D;

option MSUCClient.WebServerPort 34:34:33;

option MSUCClient.CertProvRelPath 2F:43:65:72:74:50:72:6F:76:2F:43:65:72:74:50:72:6F:76:69:73:69:6F:6E:69:6E:67:53:65:72:76:69:63:65:2E:73:76:63;

}


subnet 10.1.200.0 netmask 255.255.255.0 {

authoritative;

range 10.1.200.100 10.1.200.200;

option routers 10.1.200.1;

option subnet-mask 255.255.255.0;

option time-servers 192.168.1.2, 192.168.1.3;

option domain-name "contoso.com";

option domain-name-servers 192.168.1.1;

option domain-search "contoso.com";

option UCSipServer 00:0B:70:65:70:77:6D:7A:30:30:33:34:36:03:63:77:77:03:70:65:70:03:70:76:74:00;

}


You will need to edit this two part with the values you got previously , first highlighted section is option 43 you will have to put the entries you got  from the DhcpUtil there.
The 2nd highlighted section is for option 120, and of course the rest of the Data you know how to edit it ( domain , gateway , subnet, ranges…etc.)

and dont forget to edit your Network Setting in the script
After this copy and paste the Script into your DHCP.config File in the VLAN you are going to use for the phones devices.

Restart the DHCP services
And you are good to go.

How to make sure that it's working ???

From the command line prompts run the following command line  using a PC on the same VLAN that you confiugred , it basically emulate the request send by the phone to the DHCP.

>> DhcpUtil.exe -emulatclient

in the first part you should find the DHCP request sent to the DHCP server with the correct input of your Lync FrontEnd Name

then in the end of the output you should find the DHCP response with also the correct information and IP address , and with our lovely world "Result Successe"


Then you are good.

Friday, September 23, 2011

Certificate Chain is Invalid / Problem Deploying Lync Server 2010

Hello Everybody,

SomeTimes While Deploying Microsoft Lync Server 2010 , when it comes to Requesting and Assigning Certificate for the Lync Services It will Fail with the Following Error:

A certificate chain processed, but terminated in a root certificate which is not trusted by the trust provider. (Exception from HRESULT: 0x800B0109)

To solve this Error you will need to Download the Certificate chain from your Certificate Authority , and install it in the Lync FE .

How To Do That Step - by - Step:
  • Open An Internet Explorer at the Lync FE server ( the One You Are Running the Installation Wizard on it).
  • Write the URL of the Certificate Authority Server e.g. ( Http://ca.contoso.com/contoso-ca)
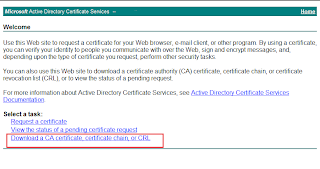
  • Click on "Download a CA Certificate, Certificate Chain, or CRL"
  • In the next Page click on "Download  CA Certificate Chain"
  • Click Save and save the Cert. to the Desktop.
  • now you will need to import, Click Start, Run and type MMC.
  • Press Ctrl+M
  • From the Left Menu Double Click "Certificates"
  • From the Certificate Snap-in Window, Select "Computer Account" and Click Finish
  • Click Ok
  • Now Expand the Certificates Menu and double Click "Trusted Root Certificate Authorities"
  • Right Click Certificates >> All Tasks >> Import

  • In the Import Certificate Wizard Welcome Page Click Next

  • Browse to the Desktop and select the downloaded Certificate ( make sure that file Type is All Files)
  • Click Next
  • Click Next
  • Click Finish
By this You had imported the Certificate and try now to re-request the certificate for Lync Services in the Deployment Wizard and it will NOT fail .

if these Steps werent Clear Enough for you , please use the Following Link

Tuesday, September 13, 2011

Microsoft Lync 2010 Server Address Book Normalization

As in Precious version of Clients , any phone Numbers stored in AD "Active Directory" phone Attributes using the E.164 formats will be displayed by Lync Client on both Contat Call menu , and contact card Details.

For example the Pattern +97112345678901 is populated on the AD and will appear on the Lync Call menu and contact card.

but if the Pattern is 0097112345678901 or 97112345678901, Lync server will fail to normalize it into E.164 and so , will not appear on the Lync Contact Card or call menu.


In order to display Number formats that not E.164 , Lync Server will need to be manually configured to properly normalize those numbers.

Configuring Address Book Normalization

By default normalization is already enabled in Lync Server which can be verified by the viewing the Lync Server’s current Address Book configuration.

to Verify this :
Open Lync Server Managment Shell (using account with Admin Previliges ) , and write the following Command:
Get-CsAddressBookConfiguration


the UseNormalizationRules Value should be Already Set to "True".

Now locate the Lync Server’s shared directory which was configured during the initial server deployment. The file server FQDN and share name can be identified in the Topology Builder under File Stores.

Browse to the share directory on the server and locate the ABFiles subdirectory.
\\LyncFEserver\LyncShare\1-WebServices-1\ABFiles

Create a new text file named Company_Phone_Number_Normalization_Rules.txt in the ABFiles directory. This normalization rules file must be stored in this location and not down a few directories where the actual address book files are stored as it was in Lync server.

Edit the file with Notepad and enter the following example normalization and translation patterns. This rule will apply to the users configured with phone numbers in this standard 14-digit format: 0097112345678901. (The first three lines are commented out and are not required in the text file.)

this Normalization rule will remove the First two Digits (00) and Add (+) instead. to convert it to the E.164 formats.

##
## Normalization rule to convert the 14-digits number starting with (00) to E.164 format
##
^00(\d{12})$
+$1

Save the changes to the Txt File and close it.
Now you will need to Update the address book for Lync Server for the new Configuration to take place,

this might take up to 5 minutes to happpen.

To Update the AddressBook use the following Command-line in the Lync Management Shell:

> Update-CsAddressBook

after 5 mintues sing out and sing in again to your Lync Client and the Phone numbers will be appearing in Lync Dial menu.

Wednesday, August 24, 2011

Exchange 2010 Edge synchronization Error

Hay Again,

Couple of days ago i faced a problem with My Exchagne 2010 Mail System ,
All external emails coming to / and going out of my organization were not going through , after taking a look in the Edge and CAS/HT Server's Event Viewer i found these two errors.

Event ID 1024 & 1036.
Source MsExchangeTransport.


After a lot of troubleshoting  i found out that the solution is to re-create the Edge subscription again , which i did , but in 24 hours the problem occured again . this time i did more digging and found out that it's because of patching level on Edge and on the HT servers,


which basicly causing the sync process to stop in the middle ( Bug )

after i installed the correct patching level on the edge server to be Exchange 2010 SP1 like the HT , the Problem stopped occuring.

Special thanks to my College Hany who helped finding out the Root of the Problem.

Monday, July 25, 2011

BlackBerry Device Does not Receive Meeting Invitation.

Hello,

I had a problem with one of my Users regarding Her Blackberry Device , she was receiving Meeting Invatetions as an Email not as a Meeting Requests.

the Problem was with Her Mailbox Configuration , something Known as " Process External Meeting Messages" the value of this option was set to "Fales" .

To solve this Problem you need to get the User Mailbox configuration and see the value of "ProcessExternalMeetingMessages" to do that use the following Command Line:

 Get-CalendarProcessing -Identity <username> | format-list


if the Value is set to "False" then you will need to set it for "true"
to do that you can use the Following Command-line :

Get-mailbox <alias> | Set-CalendarProcessing -ProcessExternalMeetingMessages: $true


check again the Value of the "ProcessExternalMeetingMessages" it should be "true" .
and this should be engouh to solve your Problem.


Wednesday, June 8, 2011

Exchange 2010 ActiveSync Problem With Iphone 3 & 4 .

Hello everyone,

Today while i was trying To configure my Corp Email Account on my iPhone 4 and my College iPhone 3 .
Configuration was ok , but when i opened the inbox on my iPhone it gave me an error says " cannot communicate with the server " .

i checked my Exchange CAS for errors i found the following error in the Event Log,

"Exchange ActiveSync doesnt have sufficient Permissions to create the "Users" container Under Active Directory user ...... "

Event ID = 1053 , Source MSExchange Activesync

Basicly it's because the Inherting Permission granted to the User.

to fix this porblem simply ( Of course you need to be a Domain Administrator ) , log onto your Domain Controller . and do the following ,

  1. Open " Active Directory Users and Computers "
  2. select the user account that facing the Problem.
  3. right Click the user and select Propertise.
  4. go the "Security Tab"
  5. click on Advanced
  6. make sure that "Include inheritable Permissions From the object's parten"

  • Click Apply , then Ok
  • Try Again after a while on your iPhone and it will work.

This fixed it for me. hope it work for you.

Cheers,

Friday, May 20, 2011

Cannot Add Servers to the DAG - Exchange 2010 SP1

Hello Everyone,

i faced a problem while creating DAG to My client, the problem was that i was Unable to add Servers to the DAG i created .

everytime i try to add a server to the DAG it gives me the following error

saying " A server-side database availability group administrative operation failed, error the operatuin failed CreateCluster erros may result from incorrectly configured Static Addresses.....etc "


Simply to fix this problem you need to make sure that " Remote Registry Service " is started and running in your Mailbox Server you want to add to the DAG.

to do that ,

Click Start >> run >> type "Services.msc" >> Press Enter

right Click " Remote Registry " >> Properties >> under startup Type Choose "Automatic"

click Apply >> Click Start >> click Ok.

now if You tried to Add the Server again to the DAG it will Work, if not , you can check my Post about How to create DAG on Exhange 2010 SP1.

Thanks again,